Google Tag Manager

What is Google Tag Manager?
With GTM, you can add, update, and remove tags using an intuitive interface, saving you the trouble of manually inserting or updating tags in the code of your website. You can have more control over the deployment of your tracking tags and can centralize all of them in one location.
Here are some key features and benefits of using Google Tag Manager:
- Easy Deployment: a process of adding tags to your website. After adding the GTM container code to your website just once, you may use the GTM interface to manage all of your tags going forward.
- Tag Templates: there are numerous pre-built tag templates available through GTM. By streamlining the setup procedure, these templates save you time and lower the possibility of mistakes.
- Version Control: With this feature, you can see a more comprehensive overview of the modifications you’ve made to your tags over time and even roll back to earlier versions if necessary.
- Trigger-based Tag Firing: You can set up circumstances (triggers) with GTM that dictate when and where tags should fire.
- Collaboration and User Permissions: To limit who can see, edit, publish, and manage tags, you can allow multiple users to access and work on the same container.
- Testing and Debugging: This enables you to quickly troubleshoot issues before implementing updates to your live website.
Create and Manage Your Google Tag Manager Account
We will guide you throughout the process of setting up an account:
- Open your preferred web browser and go to the Google Tag Manager website (https://tagmanager.google.com).
- Sign in using your Google account credentials. If you don’t have a Google account, create one by clicking on the “Create account” link.
After signing in, you will need to follow these step-by-step process to create an account.
Setting up Your Google Tag Manager Account
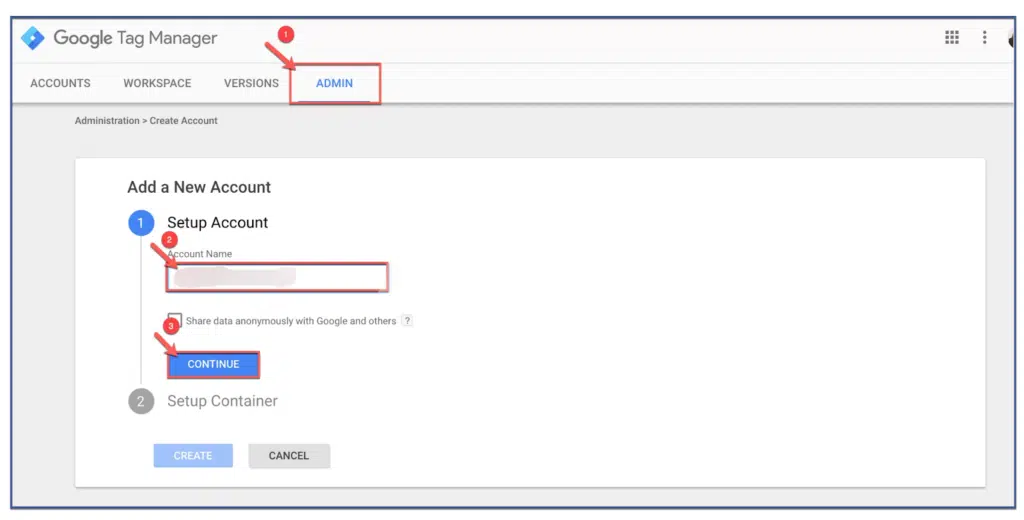
- Once signed in, you’ll land on the Google Tag Manager home page and click on the “Create Account” button to start creating your GTM account.

- Enter an Account Name for your GTM account. This name can be anything descriptive, such as your company’s name or website name.
- Choose the country or territory where your account is based.
- Accept the Terms of Service by checking the box.

- Click on the “Continue” button to proceed.
Setting up Container
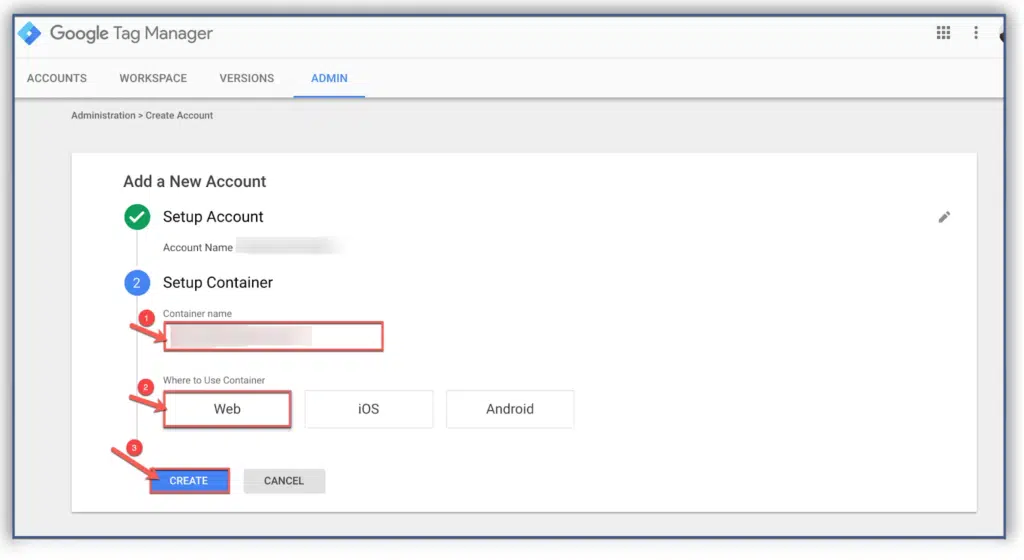
- After creating the GTM account, you will be prompted to set up your container.
- Enter a Container Name for your GTM container. This name should be unique and specific to the website or project you’re working on.

- Select the type of platform you’re using: Web, iOS, or Android.
- Click on the “Create” button to continue.
Installing Container Code
- After setting up your container, you’ll be presented with the GTM container code.
- Copy the container code snippet provided.
- Paste the container code immediately after the opening <body> tag on every page of your website. If you’re using a content management system (CMS), you can usually find a section specifically for adding code snippets.
- Save and publish your changes to make the GTM container code active on your website.
Setting up User Permissions
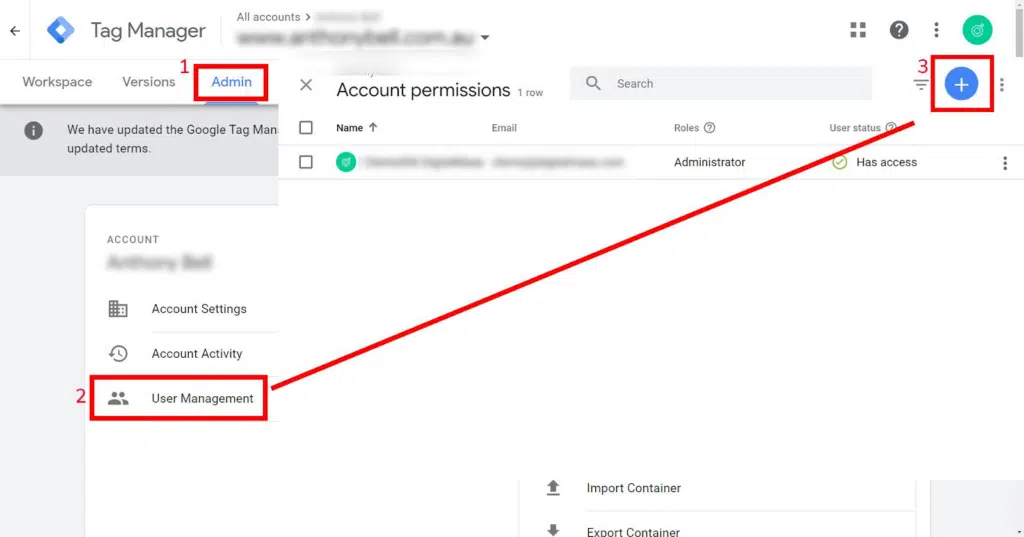
- Once your container code is installed, go back to the Google Tag Manager interface.
- Click on the “Admin” button in the top navigation menu.
- In the “Account” column, click on “User Management.”

- To invite us please enter our email address and select the “Administrator” access level, for us to modify your GTM account.
- Click on the “Add” button to save the user permissions.
With your GTM account set up, you can now start exploring various features and capabilities of GTM to manage your tags effectively.
We can certainly set up your account if you would like our team to do so. Simply provide us with the information we need to modify your account.