A relatively recent evolution in the world of search engine optimization (SEO), schema markup has yet to catch on with a wide number of smaller businesses. This is frankly too bad because it has a vast potential to drive traffic to your website while providing more informative and relevant results for your existing and future customers.
Although it is underutilized in the marketplace, this relatively new SEO tool can be extremely powerful. So in the current digital environment, wise digital marketers are targeting schema markup as an attractive strategy for any company that wants to get the jump on its closest competitors.
What Is Schema Markup?
In layman’s terms, a schema markup is a form of computer code that you can place on your website to aid in the SEO process. Google, Yahoo, Bing, and other top search engines collaborated to develop the schema concept back in 2011.
A semantic (or vocabulary-based) code, schema markup results in a prominent search engine results page (SERP) display that can capture the attention of online users when they conduct searches that relate to your company or the specific goods and services that your company offers.

To truly understand schema markup, it is important to first grasp the difference between a normal snippet and a rich snippet on a SERP. A snippet is a brief entry for each website that appears on a SERP after a user enters one or more search terms into Google or another search engine.
A normal SERP snippet shows only extremely basic web page information such as its URL, its title, and perhaps a short meta description. A rich snippet, by contrast, is significantly more complex, featuring a range of additional information that is specifically relevant to search intent. This additional information might take the form of business hours, consumer star ratings, details for a featured event, or even ingredients for a sought-after recipe.
The code that allows digital marketers to produce a rich snippet, and schema markup consists of microdata that can be encoded into any page on your website. By populating your website with schema markup, you can provide search engine users with the extra information that they want and need.

Schema markup also helps search engines better interpret the context of a user query and accurately link that query to your company and its various goods and services. Put quite simply by Brittany Bronson of the leading SEO software company LinkGraph, “schema markup is a form of structured data that helps search engines read your web pages better.”
If it can fully “understand” the content on your website, Google or another search engine can better connect that content with the people who want or need it the most. Schema markup can greatly enhance this search engine’s “understanding” to drive only the most motivated consumers to your business.
For all the reasons above, many digital marketers look upon schema markup as the modern-day virtual equivalent to the traditional printed business card. In short, it is an extremely convenient way to deliver limited but highly targeted information about your company to specific motivated consumers.
How to Add Schema Markup
Although it takes the form of highly technical code, schema markup can be relatively easy to add with the proper guidance. In fact, many search engines have free online software that you can use to add schema markup to your website with a minimum of hassle.

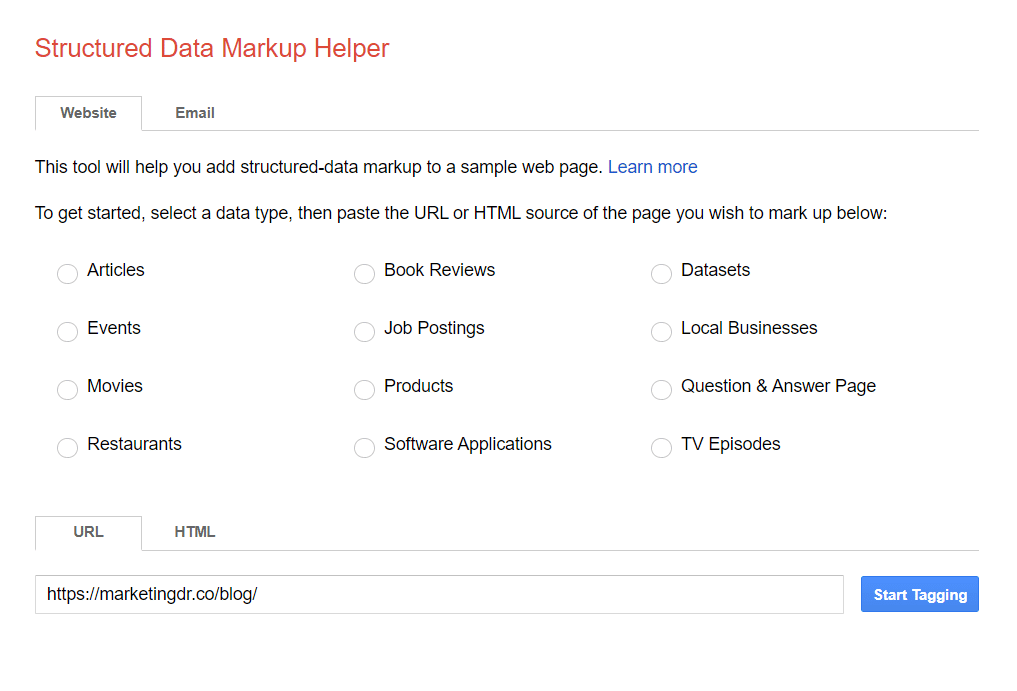
For example. Google’s Structured Data Markup Helper allows you to add schema markup to your website in just eight steps. Accomplished digital marketer and New York Times Bestselling author Neil Patel takes you through the relatively straightforward process as follows:
1. Find Google’s Structured Data Markup Helper online. You should also ensure that you also have access to every page on your website that you want to encode with schema markup.
2. Choose the type of content that defines the page that you want to encode. The Structured Data Markup Helper allows you to choose among 12 different options that range from products and articles to Q&A pages and job postings.
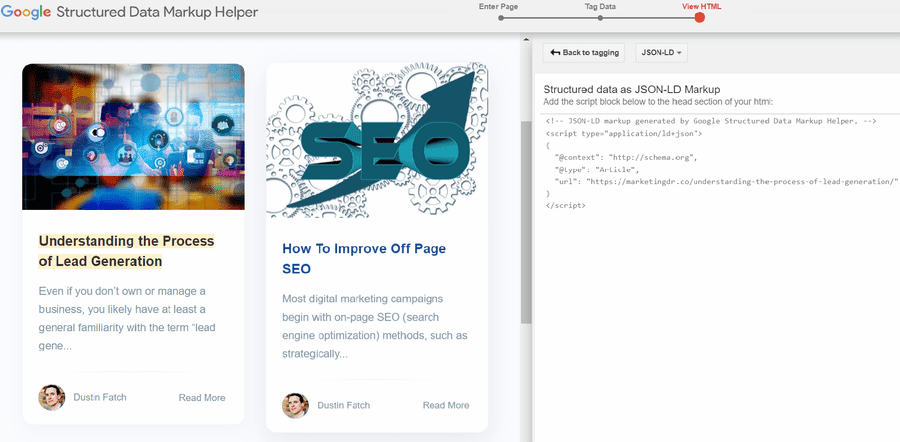
3. Cut and paste the URL or HTML address for the page that you want to encode. Then click on the “Start Tagging” tab. Your selected page will load in the left pane of the Markup Helper, and your data items will appear in the right pane.

4. Select the first web page element that you want to markup. This element might range from the title of an article to the description of a product. Just select the appropriate element type for this element and add it to your list of data items.
5. Continue adding markup items. By following the instructions above, you can markup all relevant elements on the page. The provided list of data items will help you focus on elements that are specific to your chosen content type. For an article, these elements might include the author’s name, the date published, and the ratings of reviewers.
6. Generate an optimized HTML. With a single click of the “Create HTML” tab, you can bring up the HTML of your page with microdata inserted just as you have specified.

7. Add schema markup to your site. To finish the schema markup process, go into your content management system (CMS) or your source code if you do not use a CMS. Yellow markers on the scrollbar will help you find the right schema markup code to manually apply to highlighted snippets in appropriate places.
8. Test your schema markup. After clicking on the “Finish” tab, you will be directed to a series of “Next Steps” that include a link to Google’s Structured Data Testing Tool. This handy tool can show you exactly what your page looks like with the schema markup you have added.
Let a Cleveland Digital Marketing Agency Help You!
While the basics of schema markup are relatively simple, a quality digital marketing agency such as Marketing Done Right can help you get the absolute most out of all your SEO activities.